52 Foods Week Thirty Three: Jimmy Nardello Peppers

I’m usually a sucker for anything new, exotic and improbable, so I was delighted to learn about Jimmy Nardello Sweet Italian Frying Peppers. Named for the seed saver who preserved the peppers’ stock—the son of Italian immigrants who brought them to the States—Jimmy Nardello Peppers are long, often twisted, heirloom peppers that range from a greenish yellow to a deep red. I acquired my first haul of peppers from Good Hummus at the Wednesday Farmers’ Market, then realized I wanted more and picked up a handful grown by Full Belly Farm, from the Davis Co-Op. Those from Full Belly were smaller and lighter in color than the ones from Good Hummus.

I was assured by one of the Good Hummus people that while they are traditionally frying peppers, Jimmy Nardellos are even better when brushed with olive oil and roasted. I decided to split the difference by first sautéing them in garlic and olive oil, then broiling them. I also decided to stuff them with a marscarpone cheese filling.

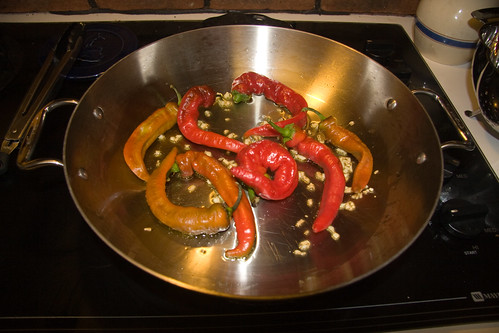
I fried the peppers in two batches, flipping them periodically until their skins were blistered and charred in some cases, then removed them to a cutting board.

Frying with Garlic in Olive Oil

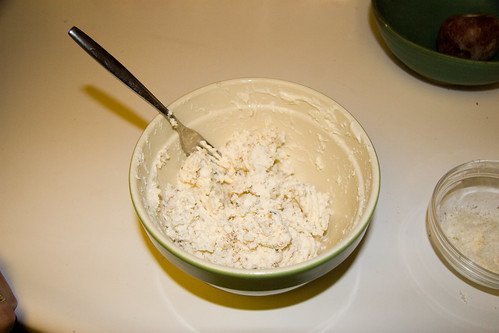
While the peppers cooked, my dinner guests helped by mixing marscarpone, parmigiano reggiano and some toasted bread crumbs together to make the cheese filling.

Cheese Filling

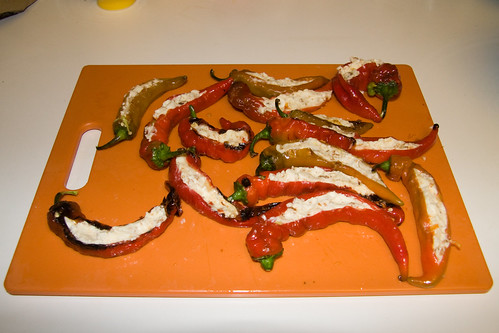
I sliced the side of each pepper, then filled them with a few tablespoons of the marscarpone mixture. Then I stuck them in the oven (set to broil), on the middle rack.

Filled with Cheese

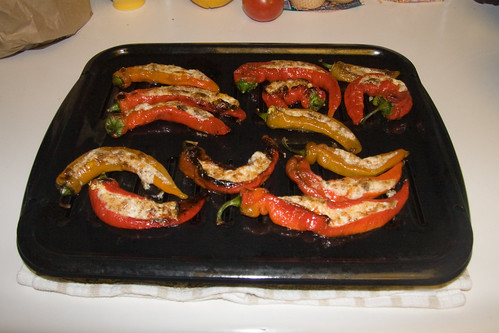
The peppers cooked for about 10 minutes, until they were lightly charred on top and the cheese mixture was golden.

Broiled Peppers

We enjoyed the peppers over couscous. The cheese mixture was lightly sweet with a little crunch, an excellent compliment to the soft sweet flesh of the peppers and their lightly caramelized skins.

Marscarpone Stuffed Jimmy Nardello Sweet Italian Frying Peppers:

12 Jimmy Nardello Peppers, large enough to stuff
1 cup marscarpone (the less sweetness the better)
1/2 cup grated parmigiano reggiano
1/4 cup freshly toasted bread crumbs
3 cloves of garlic
3 tablespoons olive oil

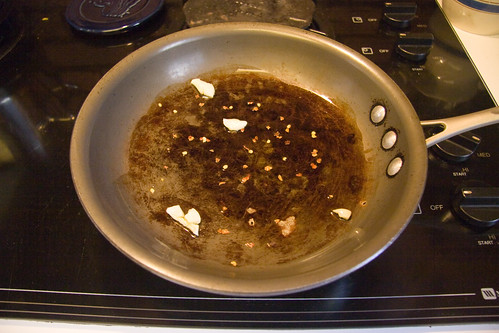
Heat the olive oil in a large pan. Add crushed garlic and cook until garlic begins to brown.

Add whole peppers to pan and cook, turning occasionally, until the skins begin to pucker and char. Remove peppers from heat and let cool.

Mix marscarpone, parmigiano reggiano and breadcrumbs in a small bowl. Make slits in one side of each pepper, then fill peppers with 2 tablespoons of cheese mixture.

Broil in center of oven for 10 minutes, or until skins start to blacken and exposed cheese is golden.

All the photos are here.

52 Foods Week Thirty Two: Cherry Tomatoes

A few weeks ago, the night we made the rotisserie rabbit, some friends we’d invited gave us a sack of vegetables fresh from their garden. Along with some tasty peppers, there was a basket full of bright orange-red cherry tomatoes. For much of my childhood, my mother maintained a hearty vegetable garden, complete with many tomato varieties, both large and small. I would often eat whole tomatoes right off the vine—like apples—a pleasure that is hard to duplicate with most grocery tomatoes, which made me all the more delighted to receive such ripe gifts from our friends’ yard.

Truth be told, I would have been happy to eat the tomatoes one by one right out of the bag, but I set some rules for myself, one of which was that all foods needed to be prepared in some way. Torn between a desire to do as little as needed and a deep respect for the rules, I whipped up a simple side of sautéed tomatoes with garlic, crushed red pepper and salt.

I crushed a couple cloves of garlic and put them in a pan of olive oil with the red pepper flakes.

Garlic and Red Pepper Flakes in Olive Oil

After a few minutes, I added the tomatoes and tossed them continuously until the skin just began to split.

Quick Sauté

Finally, I dumped the tomatoes in a bowl and sprinkled them with salt for a quick, bright summer side dish.

Sprinkle with Salt and Serve

52 Foods Week Thirty One: Lemon Cucumber

As often happens when strolling the Saturday Farmers’ Market, Jen and I came across a heretofore unfamiliar fruit: the Lemon Cucumber. Pale yellow and almost spherical, the baseball-sized lemon cucumbers we found at Good Hummus were described as a mellow, less astringent version of the common salad and sandwich component. We snatched up two of them.

As we’re in the thick of avocado season, we picked up a few of those as well, and I began to have visions of the only vegetable sandwich I’ve ever really loved—cucumber, avocado and cream cheese. With the riches of the Farmers’ Market before us, we compiled ingredients to make a gussied up version of this sandwich.

Oakland A's Colors

Instead of cream cheese, we got Nicasio Valley Cheese Company’s delicious Foggy Morning. Foggy Morning is a soft, cow’s milk cheese that is light and delicious.

Unwrapped Cheese

For bread, Jen selected Oktoberfeast Bakery’s Sabine’s Sandwich Bread, a dense but soft rye loaf.

Sabine's Sandwich Bread

I sliced the cucumbers and avocado in quarter inch slices.

Sliced Sandwich Filings

I sliced the bread, then spread a thin layer of mayo on one side and whole grain mustard on the other.

Mustard and Mayo

I spread a healthy layer of the Foggy Morning cheese on top of the mayo. In many years of sandwich making (and appreciating), I’ve discovered that the cheese almost always belongs right next to the mayonnaise, where they can conspire in a creamy, vegan-repellant delirium.

Cheese on the Bread

I piled the cucumbers on top of the cheese and the avocado over the mustard. Another thing I’ve learned from many years of sandwich enjoyment is that you always want something a little tangy next to the avocado.

Cucumber and Avocado Added

Finally, I sprinkled some Turkish black pyramid salt on the cucumbers and some fresh ground pepper on the avocado.

Turkish Pyramid Salt and Fresh Ground Pepper

The finished sandwiches made for a delightful and hearty lunch.

Finished Sandwiches

All the photos are here.

52 Foods Week Thirty: Spare Ribs

While strolling the Farmers’ Market a couple weeks ago, Jen issued me a challenge that spoke to both my pride and my appetite: “I’ve never been much into ribs before. Make me like ribs.”

We had just visited the Sunblest Orchards booth, where we picked up a jar of Apricot Diablo glaze—a tasty looking mixture of apricots with habañero and jalapeño peppers and other spices. One of the recommended uses was pork ribs, so we checked with Bledsoe Meats and scored their last rack of spare ribs.

Sunblest Apricot Diablo

Ribs, both beef and pork, have long been favorites of mine, but—an odd experiment with kangaroo aside— I’ve never attempted straight up BBQ ribs. For guidance I turned to Steven Raichlen’s How To Grill and followed his very detailed instructions for preparing pork spare ribs. I’d encourage anyone interested in grilling a wide variety of foods to pick up this book, as he covers all sorts of foods with many discussions of technique and excellent photographs demonstrating key steps. If I gloss over any of my prep steps, it’s only because I’m trying to exactly follow his lead, and you’d do better to go directly to the master than to work from my imperfect first attempt.

To begin, I trimmed the cap and rib tips from the rib rack. I also did my best to remove the membrane from the back of the ribs. When we ate the ribs, I discovered that I did not perfectly follow the line of the rib tips, and cut through a couple of them, leaving them on the rack. This isn’t really a problem, but as a matter of technique, it was suboptimal. In the future, I’m going to take a little more time with that step to get it down pat. I kept the rib tips and the cap and cooked them up the next day Vietnamese style.

Removing the Rib Tips

Following Raichlen’s advice, I submerge the ribs in apple cider and the juice of one lemon, covered them, and put them in the fridge for about five hours.

Marinading

When the ribs were done marinading I patted them dry, then covered them with a spice rub of salt, garlic salt, paprika, cumin and cayenne. In the future, I would omit the salt from this, as the ribs came out saltier than I wanted. In general, I’ve discovered that I tend to underestimate the power of salt in my rubs. I’m working on it and the first step is acknowledging I have a problem. The ribs went back in the fridge, covered, for close to three hours.

Rubbed Ribs

When it came time to cook, I fired up the Weber with mesquite charcoal arranged for indirect cooking. I placed the ribs in the center of the grill, with the coals to either side, then threw a handful of soaked and drained pecan wood chips onto each charcoal pile. Pecan is one of my favorite cooking and smoking woods. I find that it is similar to applewood, but a little stronger. It shines in a 50/50 split with oak when we make our famous Thanksgiving turkey, and works well to add a sweet smokiness alongside any charcoal you prefer, or on its own if used in larger chunks.

On the Grill

Following Raichlen’s advice, I sprayed the ribs with more cider every 20 minutes.

Spray with Cider

I also added a little extra mesquite and pecan every hour to keep the heat and smoke going.

Add Coal Every Hour

As we reached the final 30 minutes of cooking, I covered the top of the ribs with a generous layer of the apricot glaze, kicked the smoke up a notch and closed the vents to let things get nice and smokey.

Applying apricot sauce

We set the table, basking in the evening heat and watched generous billows of pecan smoke escape the grill.

Last Hit of Smoke

After nearly three hours cooking, I pulled the ribs and sliced them into five manageable pieces.

Cutting the ribs up

We served them with some homemade corn slaw. Jen happily gobbled up her first set, and reached for seconds. Success!

Spare Ribs and Corn Slaw

Photos can be found here and here.

52 Foods Week Twenty Nine: Torpedo Onion

Scouring the Farmers’ Market for an interesting ingredient, we came upon the intriguing torpedo onions offered by Towani Organic Farm. Long and purple, torpedo onions are a milder onion with a hint of sweetness and a slightly garlicky flavor. Like other onions that have passed through my care, they looked like great candidates for grilling. We decided to pair them with some goat cheese and pancetta in a sandwich.

I began by trimming the ends of the onions and slicing each one in half lengthwise.

Trimmed and Halved

We brushed the insides with olive oil, and placed them cut side down on the Weber just to the side of the hot mesquite coals.

Torpedo Onions on the Grill

Meanwhile, I sliced up some Bledsoe pancetta and cooked it slowly on the stovetop.

Panned 'Cetta

The onions cooked about 15 minutes, ’til the edges were curled and starting to char. Then we flipped them. The cut sides had beautiful grill marks.

A Little Charring

We sliced some Octoberfeast Rillen Zelm bread on the diagonal, and brushed it with olive oil.

Sliced Bread

We put the bread directly over the coals to toast for a couple minutes on each side.

Toasted Bread

We pulled the bread and onions from the grill, and drained the pancetta. Then spread some Laura Chenel Chabis on each slice of bread.

Goat Cheese

We fanned the onions out and placed them on one slice and the pancetta on the other.

Sandwich Making

Finally, we stacked and skewered the sandwiches, sliced them in half and enjoyed them alongside some Oregon Pinot Noir. These were tasty sandwiches, and the onions really worked well with the goat cheese. The grilling had softened them nicely, but they retained some body. They had a nice balance of pungent and sweet flavors. I would dare say that in this sandwich the pancetta was almost an afterthought and could have been omitted entirely.

Grilled Torpedo Onion Sandwich

All the photos are here.