52 Foods Week Thirty: Spare Ribs

While strolling the Farmers’ Market a couple weeks ago, Jen issued me a challenge that spoke to both my pride and my appetite: “I’ve never been much into ribs before. Make me like ribs.”

We had just visited the Sunblest Orchards booth, where we picked up a jar of Apricot Diablo glaze—a tasty looking mixture of apricots with habañero and jalapeño peppers and other spices. One of the recommended uses was pork ribs, so we checked with Bledsoe Meats and scored their last rack of spare ribs.

Sunblest Apricot Diablo

Ribs, both beef and pork, have long been favorites of mine, but—an odd experiment with kangaroo aside— I’ve never attempted straight up BBQ ribs. For guidance I turned to Steven Raichlen’s How To Grill and followed his very detailed instructions for preparing pork spare ribs. I’d encourage anyone interested in grilling a wide variety of foods to pick up this book, as he covers all sorts of foods with many discussions of technique and excellent photographs demonstrating key steps. If I gloss over any of my prep steps, it’s only because I’m trying to exactly follow his lead, and you’d do better to go directly to the master than to work from my imperfect first attempt.

To begin, I trimmed the cap and rib tips from the rib rack. I also did my best to remove the membrane from the back of the ribs. When we ate the ribs, I discovered that I did not perfectly follow the line of the rib tips, and cut through a couple of them, leaving them on the rack. This isn’t really a problem, but as a matter of technique, it was suboptimal. In the future, I’m going to take a little more time with that step to get it down pat. I kept the rib tips and the cap and cooked them up the next day Vietnamese style.

Removing the Rib Tips

Following Raichlen’s advice, I submerge the ribs in apple cider and the juice of one lemon, covered them, and put them in the fridge for about five hours.

Marinading

When the ribs were done marinading I patted them dry, then covered them with a spice rub of salt, garlic salt, paprika, cumin and cayenne. In the future, I would omit the salt from this, as the ribs came out saltier than I wanted. In general, I’ve discovered that I tend to underestimate the power of salt in my rubs. I’m working on it and the first step is acknowledging I have a problem. The ribs went back in the fridge, covered, for close to three hours.

Rubbed Ribs

When it came time to cook, I fired up the Weber with mesquite charcoal arranged for indirect cooking. I placed the ribs in the center of the grill, with the coals to either side, then threw a handful of soaked and drained pecan wood chips onto each charcoal pile. Pecan is one of my favorite cooking and smoking woods. I find that it is similar to applewood, but a little stronger. It shines in a 50/50 split with oak when we make our famous Thanksgiving turkey, and works well to add a sweet smokiness alongside any charcoal you prefer, or on its own if used in larger chunks.

On the Grill

Following Raichlen’s advice, I sprayed the ribs with more cider every 20 minutes.

Spray with Cider

I also added a little extra mesquite and pecan every hour to keep the heat and smoke going.

Add Coal Every Hour

As we reached the final 30 minutes of cooking, I covered the top of the ribs with a generous layer of the apricot glaze, kicked the smoke up a notch and closed the vents to let things get nice and smokey.

Applying apricot sauce

We set the table, basking in the evening heat and watched generous billows of pecan smoke escape the grill.

Last Hit of Smoke

After nearly three hours cooking, I pulled the ribs and sliced them into five manageable pieces.

Cutting the ribs up

We served them with some homemade corn slaw. Jen happily gobbled up her first set, and reached for seconds. Success!

Spare Ribs and Corn Slaw

Photos can be found here and here.

52 Foods Week Twenty Nine: Torpedo Onion

Scouring the Farmers’ Market for an interesting ingredient, we came upon the intriguing torpedo onions offered by Towani Organic Farm. Long and purple, torpedo onions are a milder onion with a hint of sweetness and a slightly garlicky flavor. Like other onions that have passed through my care, they looked like great candidates for grilling. We decided to pair them with some goat cheese and pancetta in a sandwich.

I began by trimming the ends of the onions and slicing each one in half lengthwise.

Trimmed and Halved

We brushed the insides with olive oil, and placed them cut side down on the Weber just to the side of the hot mesquite coals.

Torpedo Onions on the Grill

Meanwhile, I sliced up some Bledsoe pancetta and cooked it slowly on the stovetop.

Panned 'Cetta

The onions cooked about 15 minutes, ’til the edges were curled and starting to char. Then we flipped them. The cut sides had beautiful grill marks.

A Little Charring

We sliced some Octoberfeast Rillen Zelm bread on the diagonal, and brushed it with olive oil.

Sliced Bread

We put the bread directly over the coals to toast for a couple minutes on each side.

Toasted Bread

We pulled the bread and onions from the grill, and drained the pancetta. Then spread some Laura Chenel Chabis on each slice of bread.

Goat Cheese

We fanned the onions out and placed them on one slice and the pancetta on the other.

Sandwich Making

Finally, we stacked and skewered the sandwiches, sliced them in half and enjoyed them alongside some Oregon Pinot Noir. These were tasty sandwiches, and the onions really worked well with the goat cheese. The grilling had softened them nicely, but they retained some body. They had a nice balance of pungent and sweet flavors. I would dare say that in this sandwich the pancetta was almost an afterthought and could have been omitted entirely.

Grilled Torpedo Onion Sandwich

All the photos are here.

52 Foods Week Twenty Eight: Rabbit

To celebrate passing the Fifty Two Foods midpoint, yesterday Jen and I threw a little dinner party featuring the best recipes from the first 26 weeks. Since it was Bastille Day, I decided to include a surprise French dish of whole spit roasted rabbit. Though rabbit is a fairly ubiquitous game animal, enjoyed in much—if not all—of Europe, and not uncommon in the U.S. either, it has been forever tied with French cooking for me since seeing the fantastic rabbit skinning scene in Le Grand Chemin when I was young.

After a failed attempt to get a rabbit from Cache Creek Meat, I called a couple butcher shops and tracked down a three-plus pounds specimen at Ver Brugge in Oakland. My rabbit was raised by the Rabbit Barn in nearby Turlock, California. Ver Brugge has been my family’s go-to meat source for as long as I can remember. It was likely the source of 80% of the fish and meat I ate before age 18. Until the fantastic Laurelhurst Market opened, I spent many years in Portland chagrined at how often I had to visit grocery stores for meat rather than a true butcher.

The one time I cooked rabbit previously, Easter 2004, it came out a little dry. To avoid this fate, I planned to go with a one-two punch of a marinade for moisture, followed by a mustard paste while it cooked. For the marinade, I went with a slightly simplified version of fellow Reed alumni Steven Raichlen’s French Game Marinade from Barbecue! Bible Sauces, Rubs, and Marinades, Bastes, Butters & Glazes. The marinade is a mix of red wine, olive oil, balsamic vinegar, juniper, thyme, garlic, black pepper, clove, bay leaf and a splash of gin.

French Game Marinade Ingredients

I cooked the ingredients in a pot ’til boiling, then let them cool before pouring them over the rabbit in a large bowl.

Bringing to a Boil

As I prepped the rabbit, I was lucky to discover that it included the kidneys and liver. It only took a few minutes to realize that I should make up a little rabbit pâté.

Rabbit Liver

While the rabbit was marinating, I minced a shallot and chopped the rabbit liver into small pieces. Then I pulled out a jar of rendered pork fat I keep on hand.

Pork Fat

I placed about two tablespoons of pork fat in a small pan to melt.

Fat in a Pan

I threw about one tablespoon of the shallots into the pork fat and let them cook a couple minutes.

Shallots

When the shallots became translucent, I added the liver and cooked it for a few minutes until it was done.

Liver and Shallots in Pork Fat

With the heat very low, I added a splash of cognac and a little fresh ground pepper and some salt.

Courvoisier Is Key

The cooked liver and shallots went straight into the food processor, where I added about two tablespoons of raw, unsalted pistachios.

Some Pistachios

I pulsed the liver, shallots and nuts then added a tablespoon of unsalted butter.

Blend with Butter

A few more pulses and the pâté was well blended. I put it in a small glass dish then placed it in the fridge for about 5 hours to come together.

Finished Rabbit Pâté

My beloved Beaker & Flask frequently features a fantastic rabbit dish where the rabbit is cooked with a nice mustard glaze. With this in mind I whipped up a paste that would stick to the rabbit giving it some extra fat to hold in the moisture while it cooked. I started with two tablespoons each yellow and brown mustard seeds as well as a tablespoon of dijon mustard.

Mustard Seeds and Dijon

I mixed these with a tablespoon each of butter and salt, and two tablespoons each of olive oil and Herbes de Provence for a thick, flavorful paste.

Herb and Mustard Paste

I let the rabbit marinate for five hours, turning it about once an hour. When it was ready for cooking, the wine had turned it a lovely purple.

Five Hours in the Marinade

I brushed off the juniper berries and peppers, patted the rabbit dry, then spread the spice paste all over it.

Herb and Mustard Pasted

The rabbit was now ready to go on the spit. I speared it then secured it compactly in the center.

Securing the Rabbit

I prepared the Weber for indirect heat with two piles of Lazzari mesquite charcoal, and set the rabbit turning on the rotisserie. The Weber rotisserie is absolutely one of the coolest cooking accessories I have ever purchased. I use it all the time, with all manner of meats, and it never fails to deliver an amazing meal. It’s worth every penny if you have a Weber kettle grill.

Rabbit on the Spit

To bump the flavor up another notch, I added some pecan wood chips periodically as the rabbit cooked, lightly smoking it.

Pecan Chips Over Mesquite Charcoal

I pulled the rabbit after two and a half hours, removed it from the spit and let it rest about 10 or 15 minutes before enlisting Leon, the purveyor of amazing bacon, to carve it up.

Rabbit Resting

Rabbit Liver Pâté:

1 rabbit liver, chopped
1 tbsp. minced shallot
2 tbsp. pork fat
1 pinch fresh ground pepper
1 pinch salt
1 splash cognac
2 tbsp. unsalted pistachios
1 tbsp. unsalted butter

Sautée shallot and liver in pork fat. Reduce heat to low, add cognac, salt and pepper.

Remove from heat and place in food processor. Add pistachios and pulse until well mixed. Add butter and pulse again to combine.

Place in small dish. Chill for at least 5 hours before serving.

Spit Roasted Rabbit:

1 rabbit
For Marinade:
3 cups red wine
1/2 cup balsamic vinegar
1/2 cup olive oil
2 tbsp. gin
2 tsp. juniper berries
2 smashed cloves garlic
2 tsp. black peppercorns
2 bay leaves
2 whole cloves
1/2 tsp. dried thyme
For Paste:
2 tbsp. yellow mustard seed
2 tbsp. brown mustard seed
2 tbsp. olive oil
2 tbsp. Herbes de Provence
1 tbsp. Dijon mustard
1 tbsp. unsalted butter
1 tbsp. salt

Combine marinade ingredients in a pot. Bring to a boil then cool to room temperature. Pour marinade over rabbit in a non-reactive container. Cover for 5 hours, turning rabbit as needed to cover evenly.

Mix paste ingredients in a bowl until well blended. Remove rabbit from marinade and pat dry. Cover all sides with paste.

Thread rabbit onto spit and secure tightly in center. Tie legs together if necessary. Cook over indirect heat for two and half hours. Add pecan chips and mesquite as needed to maintain smoke and heat. Let rest 10 minutes before carving.

Finished Rabbit

All the photos can be found here.

52 Foods Week Twenty Seven: Basil

This week’s post was guest written by my wife, Jen. As I mentioned a few months back, Jen is our resident pesto expert, so when it came time to whip up a batch of traditional basil pesto, it was obvious that she should take the reigns.
-Michael

When I was 17 I lived for a year in Italy with a couple who originally hailed from Genoa, the birthplace of all things delicious—including pesto. As my host mom, Graziella, whirred the sauce together in a food processor, my host dad, Alberto, would tell me about the traditional way to make pesto alla genovese, which is, of course, with a mortar and pestle. His own mother, he claimed, would pound away away at the basil, pine nuts, garlic and cheeses for hours until it was perfect. The pesto made in the food processor could not compare. Graziella would roll her eyes at Alberto and told him to go pound it himself. While I disagree that pesto made in a food processor is inferior, I do maintain certain tenets when it comes to making traditional—albeit, good—pesto alla genovese. I take my rules for pesto directly from the best pesto-maker I know, Graziella; Suor Germana, the celebrity cooking nun who was endorsed by Graziella; and hours of my own experimenting.

When the Angels Cook

1. The cheeses must be an equal mixture of parmigiano reggiano and pecorino sardo. The pecorino sardo should be the skunkiest, sharpest pecorino from Sardegna you can find. If that is unavailable, a serious pecorino romano will suffice.

Pecorino Calabrese Riserva

2. The only nuts that belong in pesto are pine nuts. They should be as fresh as possible and then toasted until they smell like bacon.

3. The pesto should be able to hold its form on a spoon when it comes out of the food processor. The pesto then gets placed in a bowl for mixing with the pasta. Right before the pasta is done cooking, you add a little pasta water to the pesto to liquify it a bit.

4. The basil should be as fresh and local as possible. I prefer to make pesto with basil from the garden. Unfortunately, we don’t have any this year, but the basil from Lloyd’s Produce does quite well.

5. There are no exact measurements of ingredients in pesto. You add and taste and add and taste. Ultimately, you are aiming for a complex sauce that hits sweet and full on the front palate, garlicky and smoky in the middle and has a long finish of spice.

To begin!

Pre-heat the oven to 350° and place the pine nuts on a baking sheet.

Pine Nuts

While the pine nuts toast until they smell like bacon (about ten minutes, but use your nose not the timer), wash and dry the leaves of at least one bunch of basil. I like to keep another bunch on deck just in case.

Pull the pine nuts and let them cool.

Toasted Pine Nuts

Meanwhile, shred about a cup of pecorino and a cup of parmigiano.

Parmigiano Reggiano

Peel four to six cloves of garlic.

Garlic

Gather the rest of your ingredients—olive oil, sea salt, pepper—and pull out the food processor.

Basil in the Food Processor

For the first round, throw in two fistfuls of basil leaves, a handful of each cheese, a small handful of pine nuts, a pinch of salt, a pinch of pepper and about two tablespoons olive oil.

Ready for First Spin

Whir it all together. I found that after my first round, the pesto was thin and in need of more everything except olive oil. So, I added more of everything except olive oil whirred. Then tasted again.

First Round, Still Too Dry

Needed more cheeses, pine nuts, garlic and olive oil the second time. Whir. Then, taste again.

Add More Oil

Lacked spice, so more pecorino, garlic, salt and pepper. Whir. Taste. The rest of the basil dumped in plus more cheeses, garlic and a few more pine puts. Whir. Taste.

More Garlic, Pine Nuts and Cheese Too

The rest of the pecorino. Whir. Taste. A tad more pepper and the last garlic. Whir. Taste. A little more salt. Whir.

Processing

Taste. Notice heft, complex flavor, beautiful finish. It’s ready.

Taste Test

Fill large pot with water. Add a small fistful of sea salt. Boil. Add a dash of olive oil to water. Then, add pasta of choice. The traditional pasta for pesto alla genovese is trenne, but any medium-sized pasta shape will do in a pinch. This particular day, we had orecchiette, which would probably make my host parents groan.

Orecchiette

Really, truly traditional pesto alla genovese also includes boiled potatoes and green beans. I tend to think of the full-deal pesto dish as a cold day food, because it is quite filling. You boil a few potatoes in the water then add the pasta then a handful of green beans. All then gets mixed with the pesto. Because it was 100 ° out the day we made pesto last week, I stuck to just pasta for a lighter meal.

So, our pasta water is boiling and we’ve added the pasta to it and are conscious not to overcook said pasta by even a second. We transfer the pesto from the food processor to a large bowl (in which we eventually mix and serve the dish). Notice how lovelily the pesto stand up on the spoon. It is dense and flavor-packed!

Put it in a Bowl

About thirty seconds before pulling the pasta, we grab one large spoonful of pasta water and mix it into the pesto to heat it up and liquify it a bit. mix the hot pasta water with the pesto until smooth.

Add a Little Pasta Water

Drain and quickly cold rinse the pasta then dump into the bowl and mix vigorously with the pesto until all coated.

Stir in Pasta

Serve immediately. Or, as Graziella would say, “A tavola!”

Pesto Is Served

Pesto alla Genovese

(measurements are approximate; add or subtract to taste)
3-4 tablespoons olive oil
1 “bunch” fresh basil (about ten stalks with plenty of leaves)
1/2 cup parmigiano reggiano
1/2 cup pecorino from Sardinia
3-6 cloves of garlic
1/4-1/2 cup toasted pine nuts
1 teaspoon sea salt
1/2 teaspoon pepper

Combine ingredients in a food processor until well blended.

Cook pasta according to directions for al dente. While pasta cooks, mix one large spoonful of pasta water with pesto in a large bowl. Stir to combine.

Drain cooked pasta and transfer to bowl with pesto. Stir to coat and serve.

Checkout all the photos here.

52 Foods Week Twenty Two: Almonds

About a year ago, when I made orgeat for the first time, I found myself left with a significant quantity of ground almonds. In the interest of conservation and recycling, I attempted a batch of marzipan. This involved the purchase of a very useful candy thermometer and a tasteless, gritty mass of slightly sugary almonds that stuck in the molds with which I attempted to shape the confection. I realized that my almonds were not ground finely enough—the needs of orgeat and marzipan being different—and that I had likely extracted most of the delicious oils into the orgeat, leaving nothing to flavor the marzipan.

I shed few tears for that marzipan, being that the almonds were the mass-market bagged variety, and not the elegant, fresh ones grown by Sam Cabral & Family Orchard in Orland, CA. I recently purchased far more of the Cabral Family almonds than I know what to do with, specifically Nonpareil almonds.

Almonds

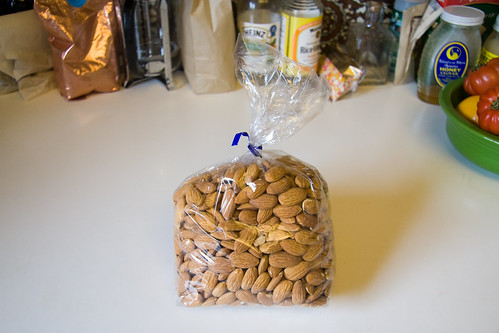
As I learned, Nonpareils are fancy, more flavorful and oily almonds, generally preferred by almond eaters. The drawback to Nonpareils is that they do not self-polinate, so other almond varieties (such as the Prince, also sold by Sam Cabral) are needed in the orchards. According to Wikipedia, California’s almond pollination is the world’s largest managed pollination, with nearly a million beehives deployed in its service.

With this wealth of almonds, I felt ready to conquer the marzipan beast, delving into marzipan theory in order to succeed where I had failed previously. A few themes I noted:

  • Marzipan can be cooked or made without heat. The cold method appeared to have many more adherents.
  • Many, if not most, Marzipan recipes call for almond paste rather than whole almonds. Almond paste can be treated as step 1 in from-scratch marzipan, and one should not aim to go from whole almond to marzipan in one process.
  • There is a slim minority who freak out about the minimal raw egg white involved in proper marzipan making. These people should be ignored, because they want to ruin your food.

A side note on raw eggs: Ever since childhood, I have been allergic to egg whites, specifically the albumen. This is a common allergy, and while mine has fortunately mellowed from violent illness to extreme discomfort, as I’ve aged, it remains a limiting factor in my consumption of egg-based meals. I realized while considering marzipan recipes that, other than baked goods, virtually the only eggs I consume are raw or barely cooked—caesar salad dressing, fresh mayo and aioli, pasta carbonara, and now fresh marzipan. I have never gotten ill from any of these. Some foods need to be raw to be awesome, and, preachy menu warnings aside, we should embrace our immune systems and nature’s shocking ability to be delicious far more often than it is dangerous.

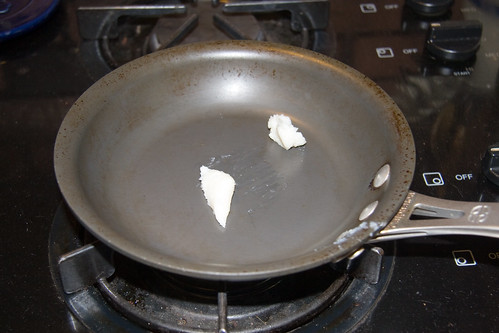
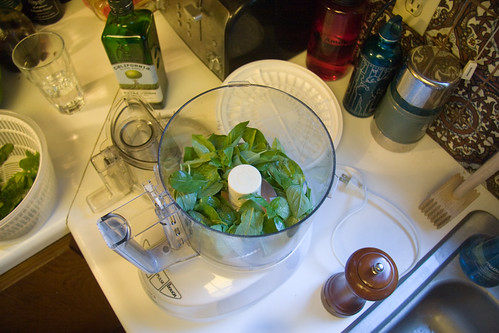
Back to the marzipan, or more correctly, the almond paste. The extremely simple recipe I used called for three things: almonds, powdered sugar and egg whites. Almond extract was optional, and I opted to exclude it. The first thing I had to do was blanch and skin the almonds.

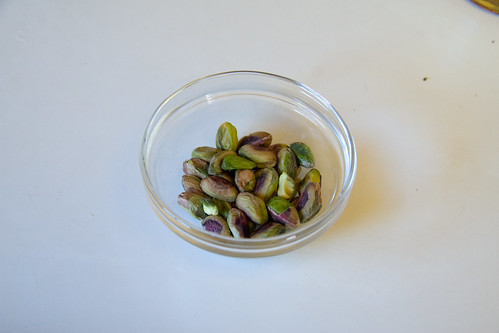
Unlike many other things I’ve blanched and skinned, the almonds were ridiculously easy. 1 minute in boiling water then 30 seconds under cold water and the skins were puckered and completely pulled away from the almonds. A pinch was all that was needed to pop the white almond free. I quickly had 1 1/2 cups of skinned almonds. I saved to skins to attempt a liqueur.

Skinned

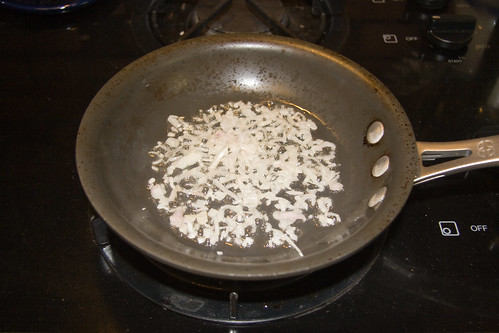
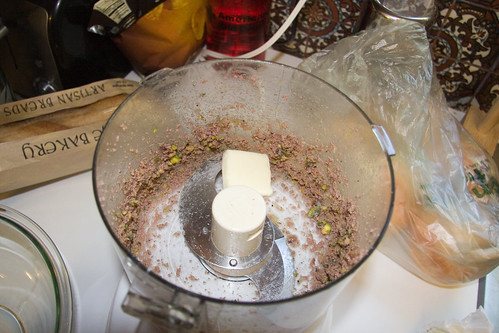
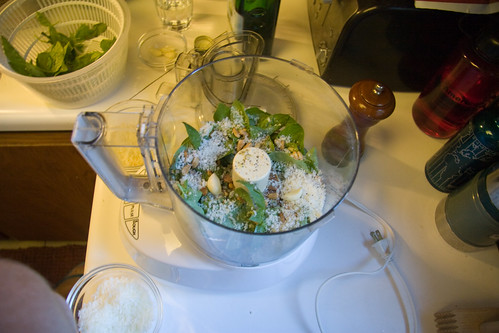
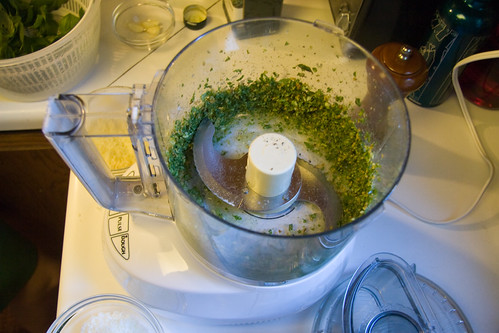
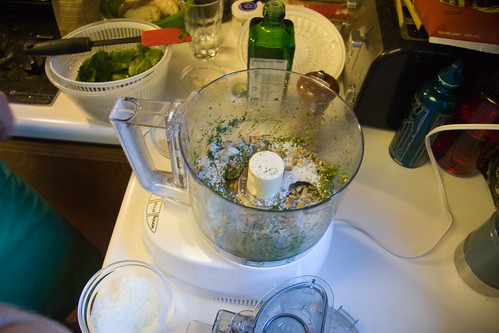
I tossed the almonds in a food processor along with 1/2 cup powdered sugar and pulsed them until they were a finely ground powder. My research indicated it was important to make sure that the almonds did not turn into almond butter, at this stage. My experience suggested that the powdered sugar manages to keep things dry enough that this is not a serious danger.

A Fine Almond Meal

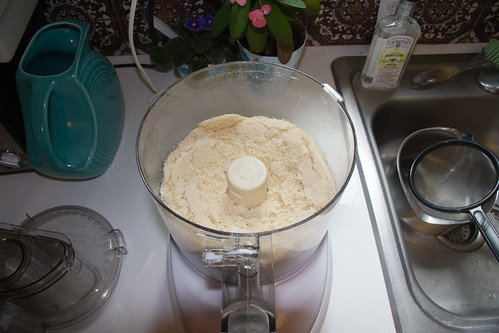
Once the almonds were completely ground, another 1 1/2 cups powdered sugar is mixed in. This results in a very dry, powdery mix, which is nothing like paste.

Add the Rest of the Sugar

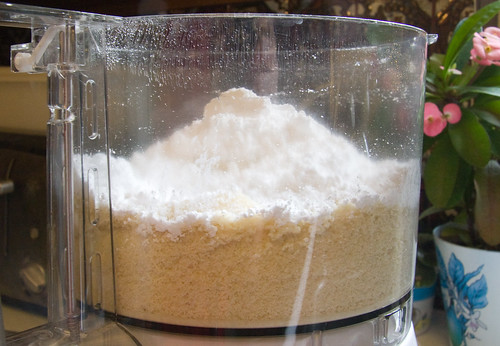
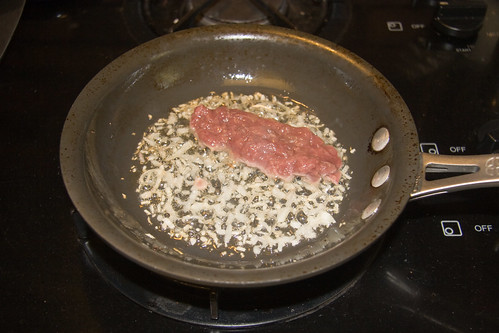
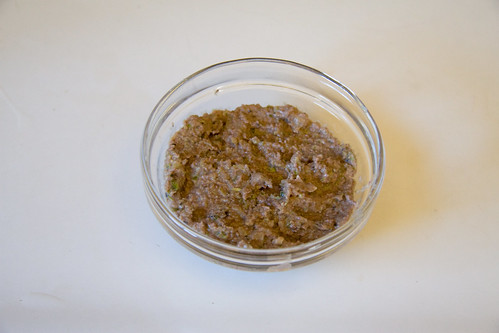
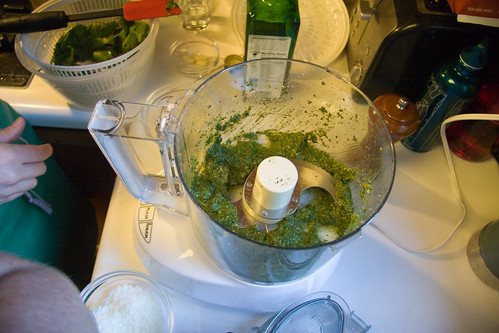
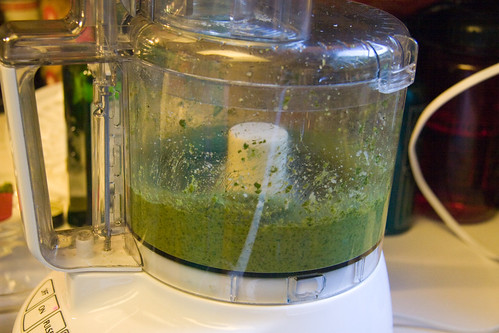
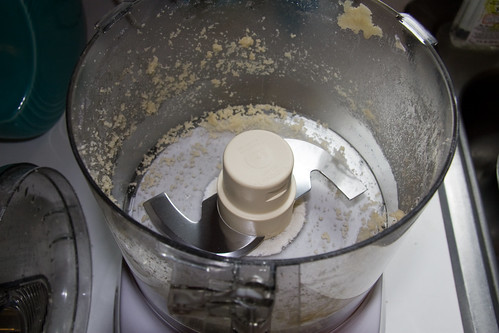
The magic in this process is the addition of the egg white. I poured it in and fired up the processor and within seconds the dry mix began to come together into a thick, solid paste.

Add the Egg White and it Comes Together

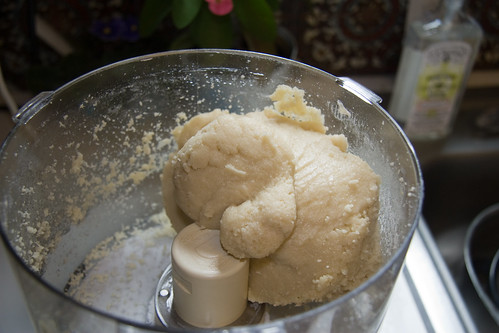
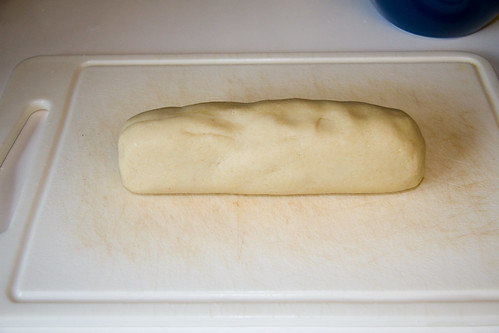
Once this was nicely formed, I removed it and rolled it into a small log. Almond paste complete!

Almond Paste

To make the marzipan, I switched the food processor to the dough blade.

Switch to the Dough Blade

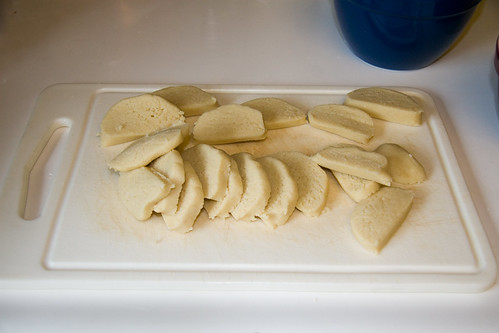
I sliced the almond paste into 1/2" pieces and dumped them into the food processor. Then measured out more powdered sugar (3 cups) and separated and beat 2 more egg whites.

Sliced Almond Paste

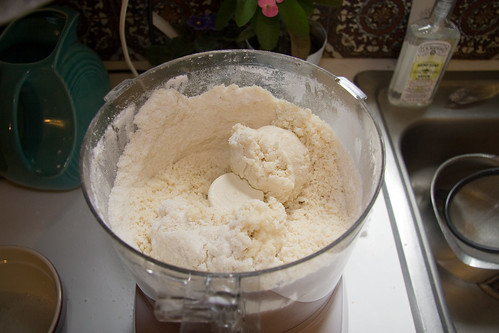
I dumped the sugar on top of the almond paste slices and fired up the food processor, scraping the sides frequently so that they mixed together evenly. The almond paste combined with the sugar to form many fairly dry clumps.

Mixed Together Sugary Almond Clumps

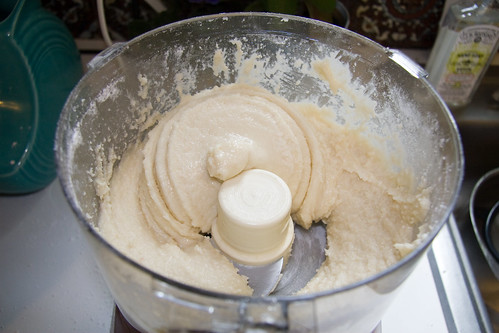
Once these were fairly uniform, and the sugar was largely mixed in, I began adding the egg whites while running the food processor. I added the whites slowly, maybe 1/2 an egg at a time, and the marzipan quickly came together into a large band. It probably took 1 1/2 egg whites, but I didn’t really have a way to measure my exact egg white usage.

A Little Egg White and it Comes Together Again

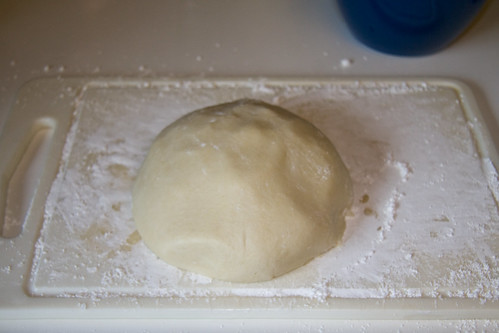
I removed the marzipan from the food processor and placed it on a powdered sugar covered cutting board. I dusted my hands with sugar, then worked the marzipan for a couple minutes into a smooth ball. I placed it in a bowl sealed with plastic wrap and refrigerated it. I also took a small taste, and was very pleased.

Kneaded Marzipan

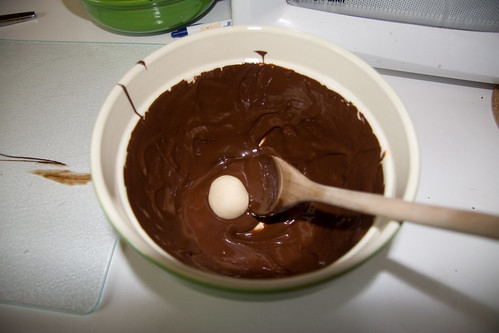
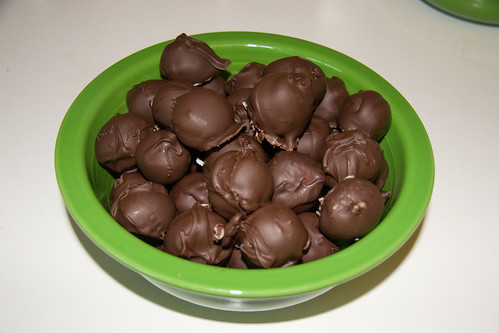
Endowed with a couple pounds of almond and egg bound sugar, I needed to come up with a presentation and consumption method that would be both elegant, and small enough that it would not kill anyone. I settled on making some marzipan truffles* by shaping the marzipan into small pieces and covering them in chocolate.

Pounded Down

As luck would have it, I was able to consult a new acquaintance who happened to be trained as a pastry chef on the proper way to make chocolate shell coating. Her instructions were pretty easy: melt the chocolate until a few shards remain solid, then temper it by scraping it up the sides of a ceramic bowl. Then dip/roll the marzipan in it and place on a greased surface to dry. Her instructions also called for a chocolate fork, which I did not have, so I substituted a corn holder. It worked well enough.

For chocolate, I began with Scharffen Berger’s Bittersweet Baking Bar, but ran out of it half way through the marzipan coating and reloaded with Nestlé Semi-Sweet Morsels for the second round of chocolate coating. I’m not sure that I can visually distinguish between them, but I would expect the first round to be a little bit more bittersweet than the second. I melted the chocolate in an improvised double boiler.

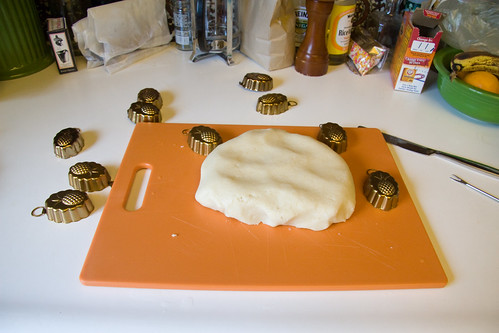
While the chocolate melted, I shaped the marzipan. Initially, I attempted to use the little Williams Sonoma molds that come attached to their gift wrapping. These were the same molds my first marzipan got stuck in, and it happened again. Even greasing the molds and chilling them in hopes of hardening the marzipan and encouraging it to shrink away from the sides, I ended up with hopelessly mangled shapes when I removed it.

The Aborted William Sonoma Mold Experiment

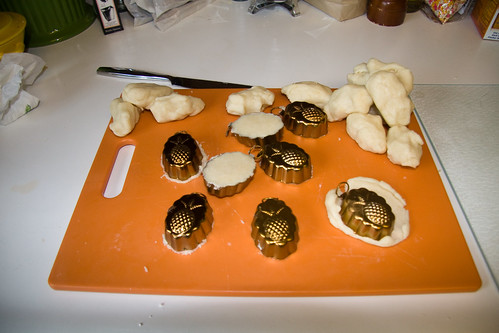
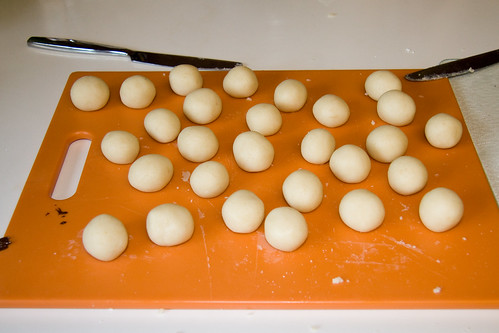
Since the molds didn’t work, I went with good old fashioned rolling little balls in the palms of my hands. This worked well, and had the added benefit of keeping each truffle under 1oz. which seems like a prudent and healthy choice. I wound up with a little over 40 truffles. These are only some of them.

Rolled into Balls

When the chocolate was ready, I dropped the marzipan balls in, tossed them around then carefully plucked them off the spoon with the corn holder cum chocolate fork.

Dip in Chocolate

I ended up with two greased cutting boards covered with truffles and errant chocolate.

Repeat Ad Fatigum

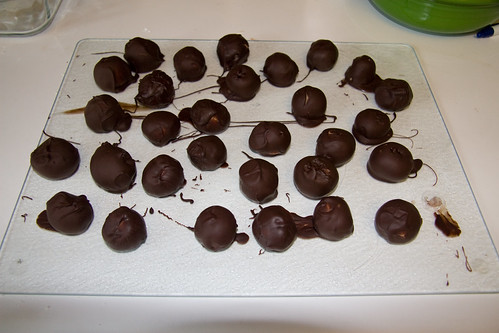
I chilled the truffles for about an hour, then carefully removed them by sliding a thin knife under each one. They were quite almondy, even without the extract, and had excellent texture. The chocolate coating also turned out well—fairly even with a nice sheen. I’d say they look and taste almost professional.

Finished Marzipan Truffles

Check out all the photos here.

  • My dictionary suggests that "bonbon" might be a more accurate term for what I made, but I’m not into splitting hares** unless we’re roasting them afterwards.

** I am, however, fine with bad puns.